Wednesday, July 23, 2014

Breakdown

She looks pretty good naked


Progress moved quickly on the Rhino removal at first

I spent about two weeks working up at least 30 different designs, and I think I've settled on the very first one that I did.

I still really like this one though. The honeycomb might end up incorporated somehow into the final design

I found a ton of Bondo on the thing. In areas even that had no detectable damage
 Slather it on nice and thick!

Without all that junk, the panels are noticeably lighter

So pretty
 If it wasn't for the four dents in it, I'd be happy to leave it just like this

But alas

 First step to new perfection, complete

some of the panels are trying to kill me though
If the first panel had been half as hard to clean as this one is proving to be, I don't think I would have gone through with it. This one's fiberglass, and the Rhino, just loves it.

Tuesday, July 22, 2014

Getting out

After just about a decade, she's back on the road. Since she last ran she's seen at least six owners, two of them were me.

I took her down to Don Tarvin and Black River Cycles for a little test and tune


 it turned out to be a little less testing and tuning than we had hoped because we were having some software issues, but I know that she's running way too rich and I've got a jet kit on order. It's taking it's sweet time to get here though.

But that's not going to keep me off the road
here with The MotoGatos RD

Squid represent. The color scheme is in constant flux at the moment. It's starting to look like a Silence Television bike with its' random stickers and icons. I'm excited about that.

 So far, I've only run out of gas twice, and electricity once. Other than that, she's been brick house reliable. Time to dig into the charging circuit a bit.

Friday, July 11, 2014

Noob

There's a new addition to the family, and she's a young'n. A friend of mine (www.cafematty.com) is planning on spending a year or more on the road starting soon and is in the purge process. He asked me if I might know of anyone who might be interested in a 2000 R6 with a charging problem that fell into his lap about a year ago. I thought I just might know the perfect person for it.


The short list reads something like this: Regulator might be bad, rear tire will not hold air (for more than a few days) wheels have been chromed, lots of random missing hardware and clips, it's got some weird aftermarket kill switch mounted, spikes on the fairings and handle bars, and the whole thing has been Rhino lined. But I'll be fixing all of that, and it comes with a clear title.


American GIs in pacific theater in world war two used to refer to the roundels on Japanese aircraft as meatballs. I think this one will be called Meatball.


There's a lot of potential here. I'm leaning at the moment towards freshening it up, maybe mounting some hard bags, and riding it everywhere it can take me. I've also been playing with color schemes for it:

It's all up hill from here...

Friday, June 6, 2014

Stand, and deliver!

I use my Pitbull center stands all the time, and I used one a lot on Squid right up until I put the exhaust on. Because the pipe is so low and long it prohibits use of a typical swing arm stand. Honda of course solved this by mounting one to the bike, and that was well enough, but I'm not one to leave well enough alone. So I chopped it off, and decided to make my own.

I've been wanting to do a stand for a while, and I've got drawings of them that I've been kicking around for years. This trouble with Squid provided the perfect opportunity to get the project done.

After taking all the measurements that I thought I would need. I taped out a mockup to scale on my workbench.


Tape's perfect for quick changes and ideation. After that I used the dimensions off the tape drawing to bring it into CAD and create splines to send to Garland Sheetmetal who does all our waterjet work when we need it. At work we're building a project that needs a bunch oh half inch aluminum parts, so I tacked my four parts onto a batch and asked him to bill me separately for those parts. Total cost was about $185 which is a lot for a center stand so I'm not certain I'd do it again, but custom parts are cool.

Anyway, this is what showed up a few days later:


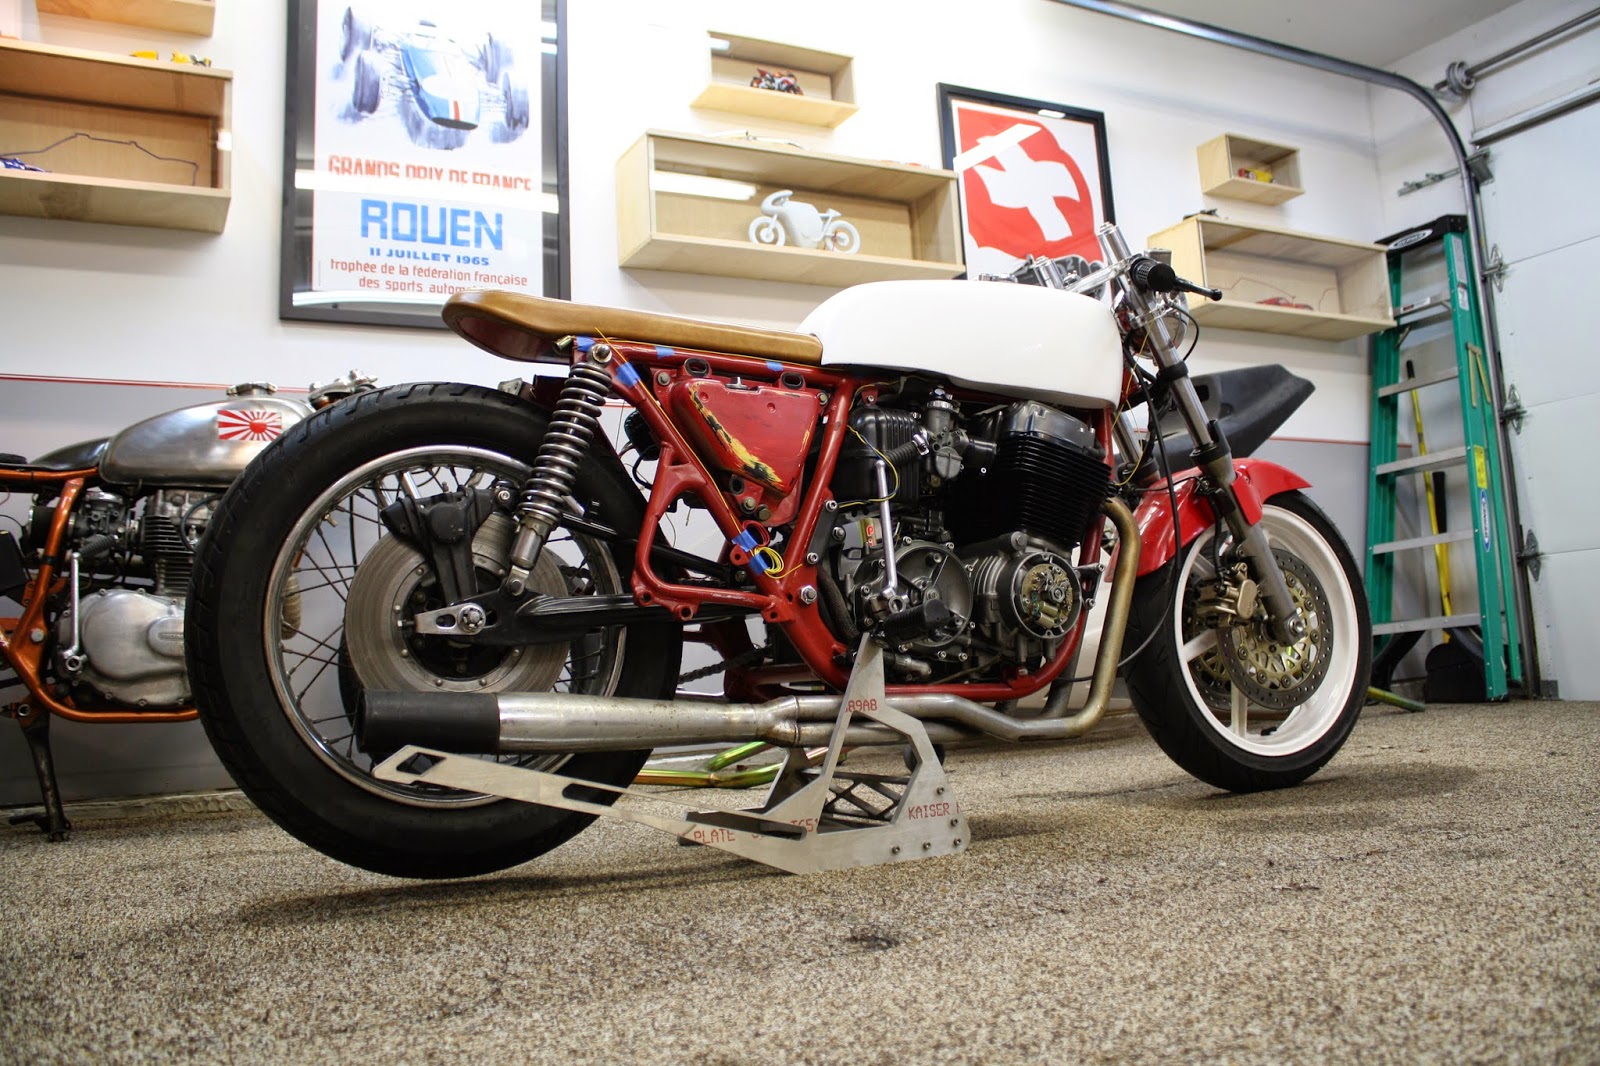
The only post work I've had to do so far is to drill and tap the M6 holes into the ends of the cross pieces.


I hadn't been able to predict where the kickstand would go or how it would interact with the stand as it rotates. As a result I had to chop out one of the rear supports on the left side, this is a bit concerning, but it appears to be handling the task quite well. I might have to bolt in a vertical strut later.


My favorite thing about this style of stand is that the whole thing is entirely within the profile of the bike:


Both bikes in the background are on traditional stands which make them in storage essentially a foot or more longer than they really are, which can become an issue when working with a fairly confined space.

It's quite a bit of effort to slide it under the bike and there are plenty of things I would change if I were to do another. But over all I'm pretty happy with it.

Thursday, June 5, 2014

More is more

At Barber I was able to pick up a little Lucas (I think) headlight for Squid. Until now, I've not managed to put it on the bike though, It's one of those last steps that's easy to put off.

We've been running a lot of 4 axis parts in the shop lately so I took a few lunch hours to finish up this project.


Inside bracket:

Outside:

It turned out to be a full 4 sided part, they ran just under an hour a piece with a big fat 3/4 cutter. This is the whole batch

At first I had the brackets clipped on right under the triple, but it looked a little too Sportster for me. So I dropped them down about three inches:


I'm digging them, at some point I'll make some new clipons which should allow me to move the bars forward a bit and everything may shift, but I'm happy to be able to put her on the road (fingers crossed) like this... With new paint, I can't stand the paint.